
My interest in electronics started with me wanting and then getting a Philips Electronic kit, I think I was eight and got the smaller version and then later I got an upgrade kit. I think that I ended up with the functionality of the EE20. From that moment the magic of electronics had me in its grip. The first circuit I put together didn’t work and my Dad looked at it and with a few tweaks got it going. I’d put the electrolytic capacitors in the wrong way around. Later I used to get electronics magazines, like Elektor and save up to buy the components to build things, as time went by integrated circuits used to feature more and more to the point where they seemed to take over. Two of the more ubiquitous ICs, or chips, were the 555 timer, introduced in 1972 and the 741 op amp, in 1968.
Not surprisingly I ended up as a chip designer and used the Commodore PET as a low-cost bench testing tool. I seem to remember re-writing much of the test software in 6502 assembly language to get it working faster. So I have designed ICs, PCBs, digital and analog systems and although I am not a coder I have written a bit of code as well.
I have replaced stuff in my PCs, upgrading both software and hardware. But I have never built my own PC, nor indeed have I specified my own computer (I don’t count ordering from Dell as specifying). I did think about using a Customer builder where you select what you want and presumably their systems ensure every thing is compatible. They then build it, test it and ship it to you, with a warranty. But where is the fun in that.
The only problem was that my current computer – a Dell Dimension 9200 (with some tweaks) was playing up. I need a computer for both work and play, so at one point was considering just buying an off the shelf computing and shelving the self-build ambition for another few years.
Fortunately with a lot a messing around I have gotten my Dell to a reasonable level of stability and the self-build was back on.
So here I am on Day 1, I’ve order all the parts and they are sitting on the dining room table ready to be assembled. Despite the ton or reading I seem to have done there are questions in my mind that I don’t know the answers to. Some of them are probably silly – like what order should I build the computer in. My Mobo (Motherboard) has on-board graphics, but I have added a separate Graphics card, so when I switch on for first time which one do I use?
My plan was to take things steadily, if I was unsure about something I would research it on the web. A reasonable plan was to start by checking out the case and then sticking in the various drives and PSU followed by the Mobo. I also would only work on it when not tired. Although I have in the past had to work through the night I know myself well enough to know that the mornings are the best time to work on stuff like this.
The other thing I did was make sure I had some tools to hand, including a multi-meter, various screwdrivers, a conductive mat and wrist-strap and some tweezers. Although integrated circuits are less prone to static than they used to be, there was no point in taking chances. Also I read somewhere that you always end up dropping a screw into the build and so having a pair of tweezers to hand seemed like a good idea.
A Computer – waiting to be built

The first thing out of its box was the Case. Why did I wait until the build before unboxing and checking things – well it reduced the chances of losing things. Here is the Zalman Z11 Plus and here is a review. It was well packed and pretty clean.
Zalman Z11 Plus Computer Case

The rear of the case of the case. One of the reasons I got it was because it came with a bunch of fans. Integrated Circuit (un)reliability is a function of the operating temperature. The mat it is sitting on is my conductive mat.
Zalman Z11 Plus Computer Case

The manual was inside the case, which was a good job as I thought it was missing at first – which wouldn’t have been a good way to start. I hade an electronic copy though and had printed out bits of it including the parts list. I then went through ensuring all the parts we as described and in the right quantities. The case was easy to disassemble. The four thumb screws can be seen in the last picture. Once those are removed then that side panes slide off and out. Here is the case with one side panel removed and the front of the case is on the right hand side.
The case comes with a CPU12V Extension cable, mine was a little different to the one in the drawing. Mind you at this stage I hadn’t really got much idea whether I would need it or not.
I also checked through the various internal cables that had been fitted. These include the two USB 3.0 leads, a dual USB 2.0 lead and various cables for the Disk Activity light, On/Off and Reset Switches.
Zalman Z11 Plus Computer Case – side panel removed

The case had protective plastic on various areas including one of the side panels, part of the top and the front. The case has two USB 2.0 and two USB 3.0 sockets on the top/front along with audio jacks and a reset switch and Disk activity LED.
Through the build I kept a diary on my iPad, mainly to record questions that occurred to me. Here is one of the first questions that appeared.
Question: I have five fans in the case and one on the CPU? But the motherboard has a CPU 4 pin connection, 4-pin chan fan 1/2 and a 3 pin par fan.
So I will need to split the 3 pin power connection two ways? (top and front)
Will I also need to split the two channel fan into the three 4 pin fans (back and sides)Current plan:
CPU fan to CPU connection on Motherboard
Back fan 4 pin to power supply 120 mm
Left and right 4 pin fans 80mm on Motherboard
Top and front 3 pin fans 120 mm to Motherboard via splitter
Zalman Z11 Plus Computer Case – top plus protective plastic

The next item I unboxed was the PSU a Corsair AX760, here is a review. This was not a cheap PSU, mind you I figure that good reliable power is important and this was efficient even at low loads and it would not be a major contributor to the heat. (Some PSUs are not efficient unless run near their max loads apparently.)
When I unboxed it I was impressed. If attention to detail is anything to go by this was a quality bit of kit. The PSU unit was in a separate padded “box”, back left, the cables also had their own bag. Then PSU also came in a further cloth bag, seen on the front left of the picture. This PSU also comes with a 7 year warranty. Companies tend not to promise long warranties unless they believe they won’t need then.
Corsair AX760 PSU

As you can see to make things easier I removed the other side panel as well. The PSU screws in with four bolts and sits rubber feet to insulate any vibration. One feature that had me a little confused was the PUS had a small switch marked Normal / Hybrid, whilst the Manual has the switch labelled as Normal / Other. I set it to Normal but will check out what it means later.
First Component in place – the PSU

The next question in my mind was whether to start building the Mobo, or screw the Mobo in whilst access was easy or go with the drives. In the end I decided to stick the drives they weren’t going to get in the way of the Mobo.
Here is the Samsung 512Gb 840 Pro SSD - tiny, it is a 2.5” drive and so you could easily stick it in a Laptop. It has two places it can be put on this case. It can fit in a caddy and go in one of the HDD slots, or behind the Mobo. It screws directly down onto the panel. It took a while for me to work this out. Alternatively it could have gone into one of the trays. There are 10 5.25 slots. The top five are nominally for optical drives. The bottom five are for HDs. Although the bottom slot of the top five has an optional 3.5/2.5 tray for a FDD/HDD/SSD.
Samsung 512Gb 840 Pro SSD

For some reason I don’t have a picture of it screwed in to the – I’ll stick one in tomorrow. f you look two pictures back, just above the PSU is a square mesh, it screw on the outer side of that mesh.
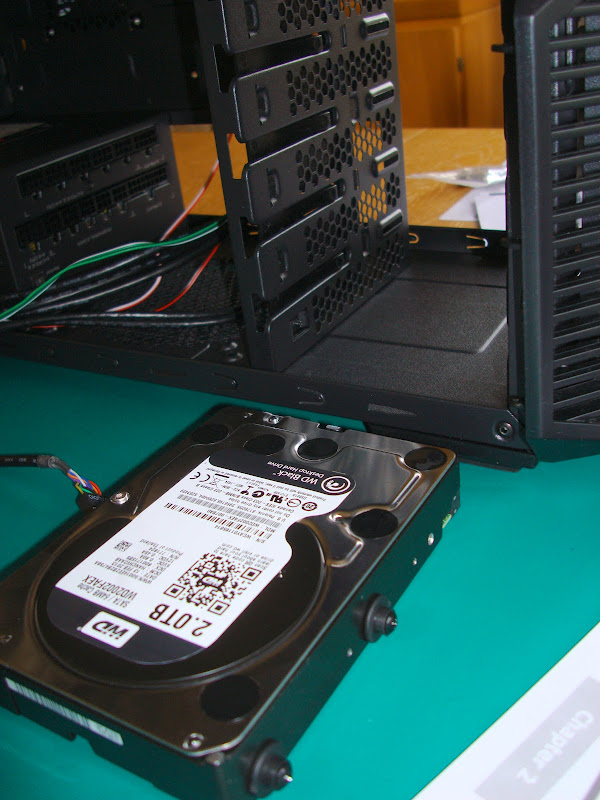
The next bit of the build was the HDD – a 2TB WD Black HDD. This came in an OEM box (brown cardboard).
WD Black 2TB HDD

The Case came with screws and rubber mounts which get screwed to the sides of the HDD – it then slides into one of the slots from the side. The rubber bungs help to insulate it form the case. I guess this is both to reduce noise transmission and reliability. It means that the HDD stack have their own fan!
HDD ready for mounting in the case
The next device up was the Optical Drive. I chose an ASUS BW-12B1ST because some reviews on Amazon made the one I was looking at originally a dubious choice. As I research my build I am getting more impressed with ASUS, their products seem well received. There is quite a lot of complication in terms of Blu-ray standards, well I thought so anyway. You can get single layer (25GB) , dual layer (50GB), triple layer (100GB) and quadruple layer disks (128GB), although the maths doesn’t seem to work there. The standard is BDXL – not an accessible acronym as far as I am concerned. I don’t tend to make backups on optical disks anymore. I rely on internal and external HDDs.
In order to fit the drive I had to unclip the front of the case – there is a switch in the front and conveniently the cables have plug/sockets so you don’t need to leave the front dangling awkwardly. The green and white wires on the top right are those wires, the plugs are black and a little hard to see in the picture. The Manual does have a reminder that you need to join then when replacing the front of the case – otherwise you will have problems.
The topmost slot had already got the blanking plate removed. Although I forgot to remove the corresponding plate on the front panel. and wondered why it wouldn’t fit back on. The Optical drive sticks out a bit, in order to be flush with the front panel. The blanking plate is clipped in and is removed by easing the clips and pushing it from the front.

A little out of order – but here is a picture of the drive, box and CD. It slotted in from the back with two screw on each side. Actually I can’t remember whether it went in from the front or the back. Mind you at this stage it doesn’t matter.
ASUS BW-12B1ST – Blu-Ray Drive

Not a bad day’s work even if I say it myself, tomorrow I will tackle the Mobo – do I mount the Mobo and then the additional components or do I put the components on and then mount the Mobo? Whatever it will be easier when I am alert. I reckon the case is pretty well finished although I have ended up with a slight “razor” cut from a metal edge.
No comments:
Post a Comment